Quiet Crow Bonsai
A Collection of Stellar Bonsai MusingsArticles
Technique: Improve Your Bonsai Set a Direction
So you’re looking down at your bonsai and wondering why after a few years of working on them, they don’t look like how you imagine them in your head. Maybe you’re new to the art and you’re having trouble with wiring. Whoever you are and whatever your problem, you all have something in common. You want to get better at representing trees in nature.
In my previous article for Improving Your Bonsai , my best tip was the uninspired answer of "practice practice practice." At its core this advice is sound, but the answer I just gave is just regurgitated what I heard a thousand times over from other teachers and has not expressed much beyond that. Diligence is the key, but without a direction or goal this diligence might be wasted furiously wiring branches or other techniques that will neither improve your skills nor expand your creativity. In what will hopefully be a concise guide to getting better at bonsai, I’ll go through WHY you’re having difficulties, how to improve and share the defining ideas and principles that helped me learn. I’m not a professional or a teacher, and everyone has their own way of learning, so please critically consider what I say.
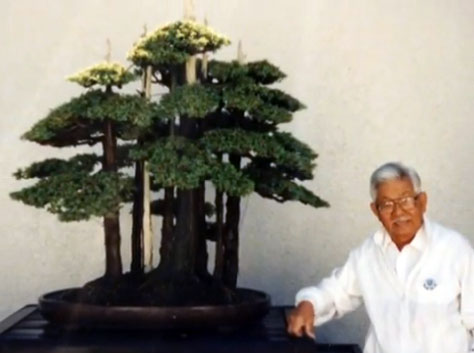
John Naka with Goshin
Identifying the problem
Why was John Naka able to design Goshin the way he did, why are there professional artists and even enthusiasts that make it seem so easy while you’re struggling to just get a tree right? I’ve been there I’ve struggled over and over on a single tree and wondered why it looked nothing like the wondrous images in my imagination. It’s frustrating. So what’s the problem? The problem is that while we may say that “we’ve been doing bonai for years” the truth is we’ve never really bothered to LEARN while we practice. We were content with recycling what was already in our head: drawing from imagination the same tree over and over and over. That is NOT how you improve. We never took a large portion of our time to observe trees around us and soak up how the world actually looks. This applies to how a branch looks/what branch structures are underneath, how the leaves behave. How can we expect to progress when we are closing our eyes and our minds to the world?
From informal upright, cascade to forest planting to any style of bonsai, they all come from the same source: real life. The reason we recognize a root over rock is because it’s based off a root over rock. The reason we see a cascade over a mountain as such is because it’s based off a real cascade. No matter how exaggerated the features or dramatic the jin and shari, all of it has a basis in real life.
How to go about improving
So we’ve figured out the fact that we can’t design bonsai well is because we’ve been neglecting to study trees in real life. Now comes time for the actual action. But simply ‘looking’ at life and trying to remember the features will not do. We learn from repetition and everyone who designs a good bonsai has designed many from life. That’s the root of it all.
Draw from life
If you want to get better at bonsai, design a tree that is there. NOT from imagination, remember that’s just a rehashing of your old ideas. Learn from seeing the material in front of you, a picture you see on the internet, anything. There is more to it than that though. If you mindlessly play away you’re not learning much. You have to focus your efforts in accurately observing your subject. Don’t inject drama and refrain from taking liberties when you’re just starting out. Your job is to represent a tree and soak up how the tree REALLY looks. Designing accurately is tough, we weren’t meant to be cameras. This is a problem and until we learn how to design from life accurately. So to progress, we need to accurately observe.
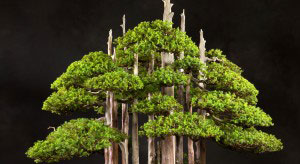
Goshin
Measure with your eyes
Using the spirit of observation, try to compare the sizes and shapes of some objects or features in your bonsai to other features. An example would be looking at the thickness of the trunk and comparing it to the width or length of the first branch. By referring these shapes and distances to each other, it’s much easier to come about an accurate representation of a tree in nature. As a general rule, work from large shapes to small, don’t create the tip of the branch then move onto the first bend from the trunk. Start with the general shape and size of the total trunk and canopy compared to the main and secondary branches, then work inward, making sure to check and double check that features line up
Create depth

Depth: 3 dimensional form
Planes are the flat geometric shapes that make up a 3 dimensional form. A side of a square is a plane. If you shine a light on that cube, you would see that depending on how much a certain plane is facing towards the light, it will appear lighter or darker. A plane on the side of the light source will be lighter than one facing away. There are subtle variations on the light and dark as well, as maybe the top of the cube could be lighter or darker than the side facing the light. This use of planes to trace over a 3D form helps in ALL areas of art. Everything that is 3D can be turned into planes. The key is to think in 3 dimensions within your bonsai. Think about how a branch pushes FORWARD and OUT into 3D space while the secondary branch slide away, up or down and recedes. It takes practice, but this is the most important thing in creating depth.
After proceeding like this for a while, I noticed an improvement in my overall bonsai ability. I was soaking up this new information and applying it in my other trees. There was another problem though: Things looked flat, and I couldn’t create things in perspective. This is where another key idea comes into place. Diligence. Read More